Happy Valentine’s Day! This year, to celebrate my love of Valentine’s Day, I made these Love Monster Cupcakes and this Valentine Dragon inspired by the Google Doodle of the Valentine’s Day pangolin.
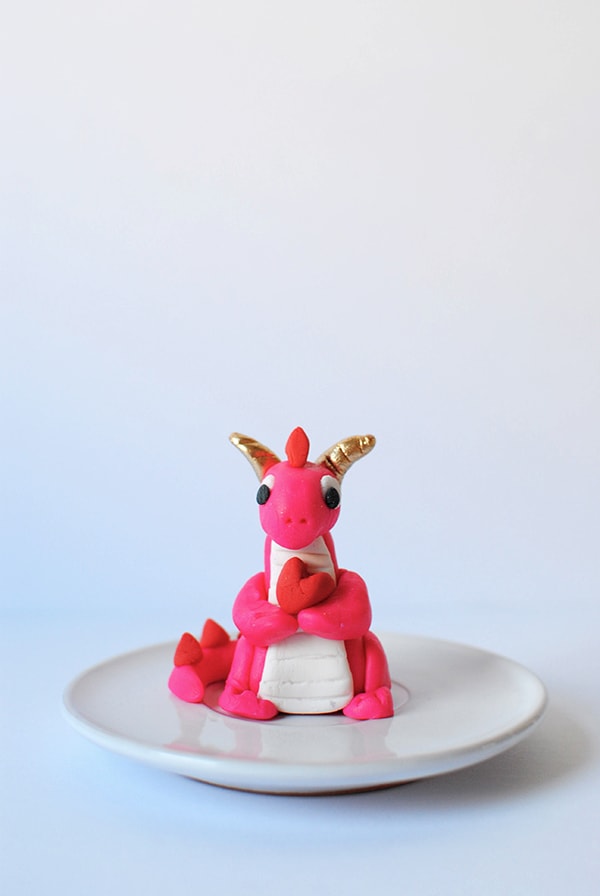
Now, I know the Valentine’s Dragon might look challenging, but I promise you he’s not! My artistic skills top out at drawing stick figures and this is the first fondant creature I’ve ever made. Up until I made this Valentine Dragon, I was really intimidated by fondant. But, then I started thinking of it like adult Play-doh and I was like, I got this! And, again, I would like to mention that I am not an artist. So if I can do this, you can do this.
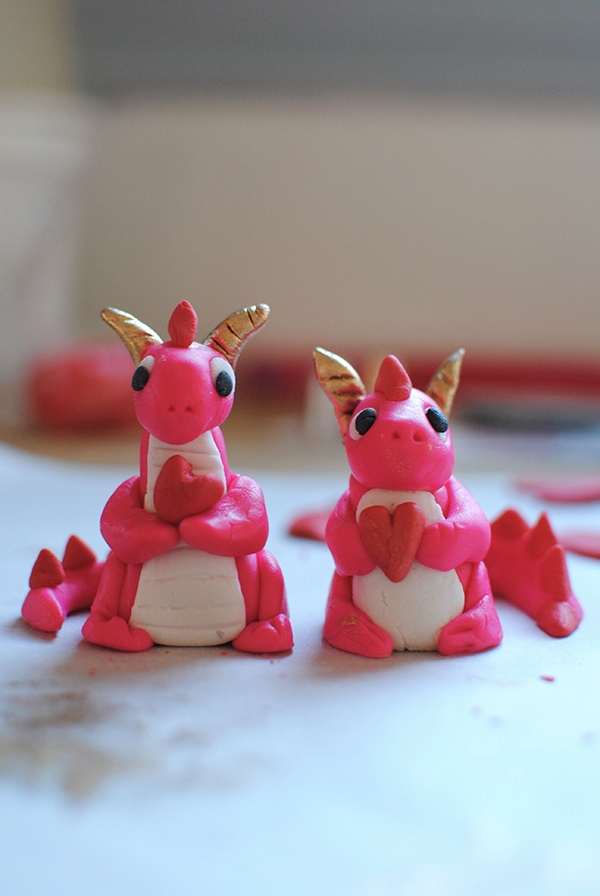
Tag your Instagram with #LetsEatCakeValentine so I can see yours! But first, let me show you how to make the Valentine Dragon. The little baby Valentine Dragon here was made by my friend Becci in just 30 minutes!
How to Make a Valentine Dragon
This little guy (or gal) is a bit more involved than the Love Monster Cupcakes but he’s easy. I’ll walk you through just how I made him step-by-step.
Materials Needed:
* White fondant
* Pink fondant (or pink dye)
* Red fondant (or red dye)
* Black fondant (or black dye)
* Toothpick
* Tylo Powder
* Ball tool
* Blade tool
* Veining Tool
* Edible glue or vodka
* Gold highlighter
* Paintbrush only used on food items
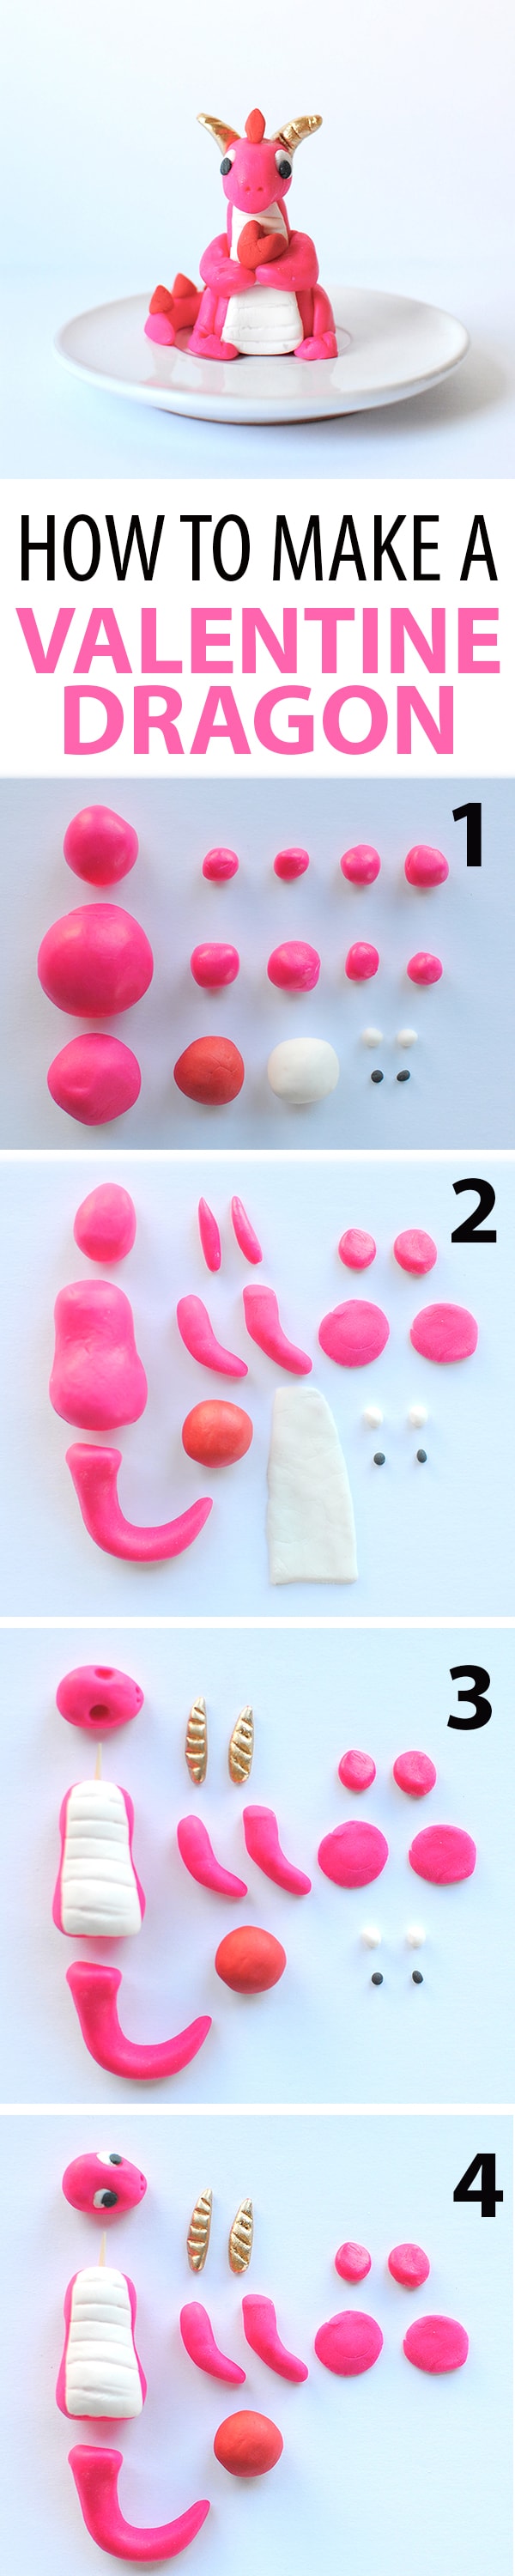
1. Mix the Tylo powder into your pink, white, red, and black fondant. Knead each to combine. This will help the fondant be less sticky as you work with it. (If you have only white fondant and are dyeing each the color you need, create the colors you need and then work the Tylo powder in.)
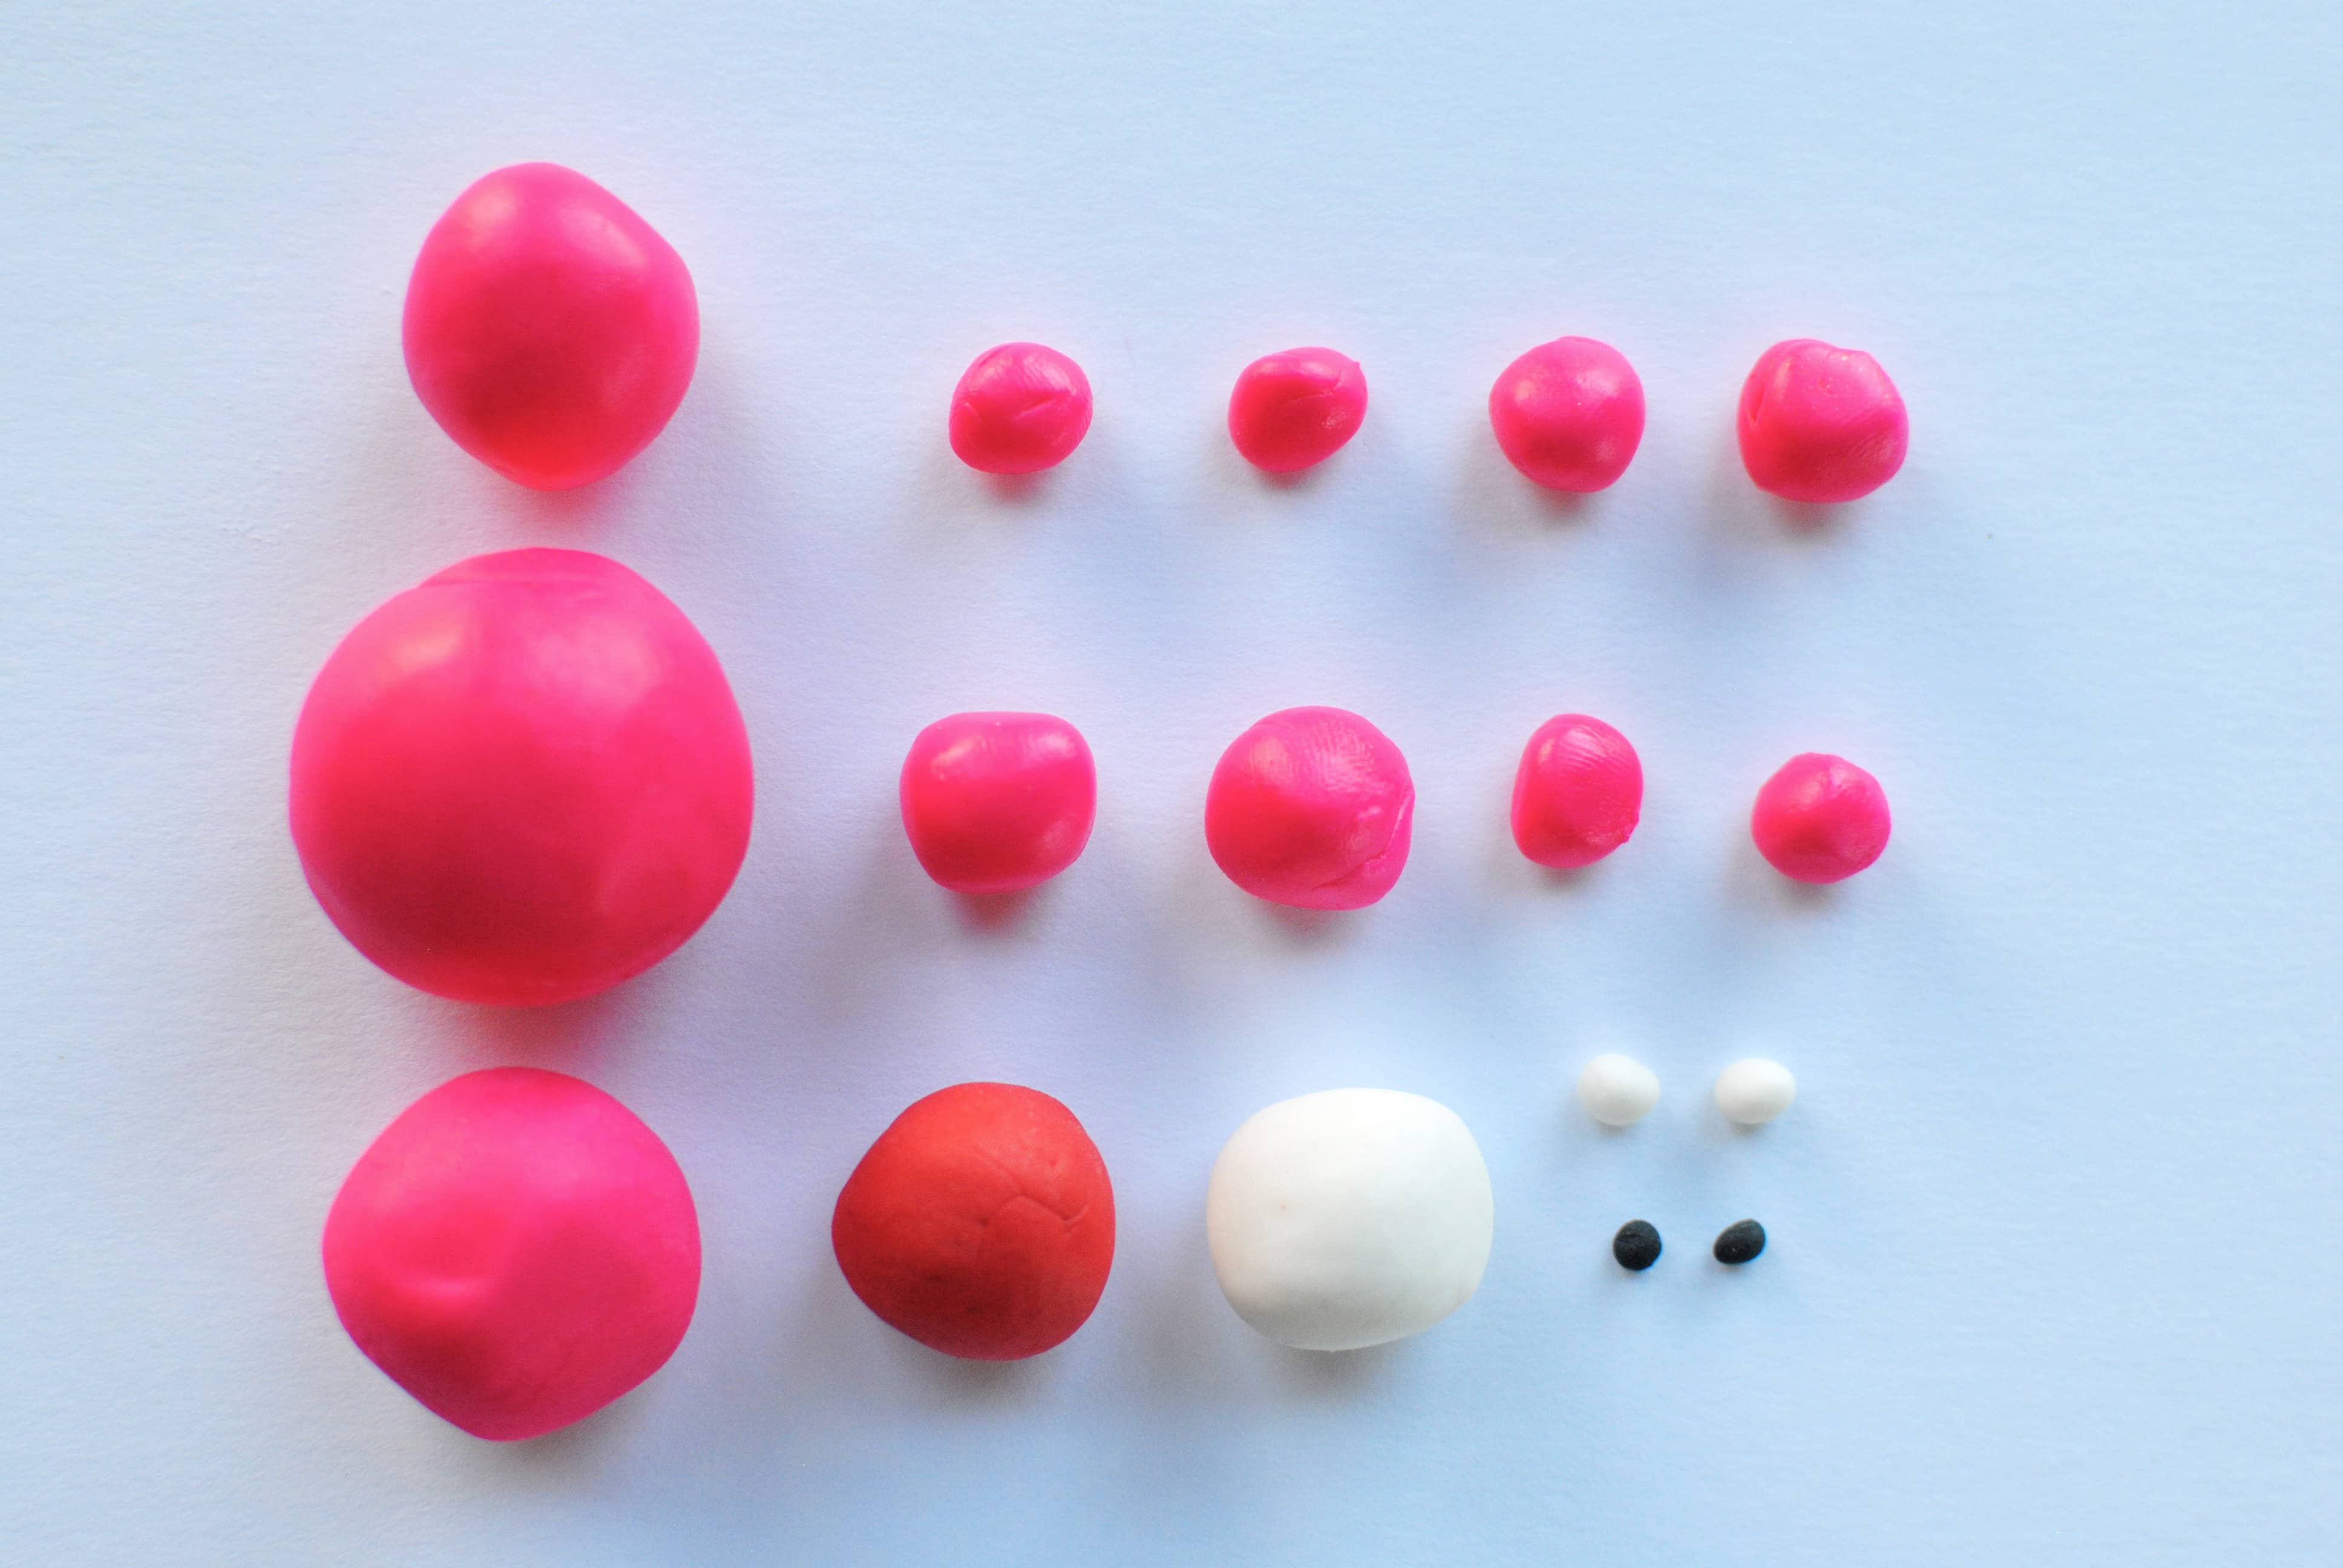
2. Roll balls in the following sizes and colors:
Pink:
• Four 1/4″ balls
• Four 1/2″ balls
• One 1.25″ ball
• One 1″ ball
• One 3/4″ ball
Red:
• One 1/2″ ball
White:
•One 1/2″ ball
• In the image below, I rolled out the balls for the eyes too, but it’s ok to wait until they’re ready to be added to do this.
3. Shape the two 1/4″ balls of pink fondant into horns. Use the blade tool to gently add lines for dimension. Paint with gold highlighter and let dry until firm.
4. For the body, take the 1.25″ ball of pink fondant and place one end in your palm and cup your hand. With your other hand, work the fondant to create a cylindrical shape.
5. Roll out the 1/2″ ball white fondant and cut it so it is slightly smaller than the front of the cylinder. Use the blade tool to gently create evenly-spaced horizontal lines.
6. Paint the cylinder with a little bit of vodka (or add a little edible glue) and attach the front piece (this is the underbelly). Let this dry.
7. Shape the legs by squishing the 1/2″ balls of pink fondant and attaching them on the bottom of each side of the cylinder. Place the two 1/4″
balls of pink fondant under the legs and attach them so you can see the feet sticking out of the front. Use the blade tool to gently create toes.
8. Shape the 1/2″ balls of pink fondant into little tubes and fold gently at the elbow. Attach to the body to create the arms.
9. Cut a toothpick in half and gently insert the pointy end into the top of the dragon body. This will let you add the head later without squishing the body.
10. For the head, shape the 3/4″ ball of pink fondant into a slightly squished egg. Attach the horns with the help of edible glue or vodka. A little gold might come off. That’s ok, just wash your hands and let the horns dry into place before moving to the next step.
11. To create the facial features, use the small end of the ball tool to create two sockets. Add a white ball of fondant into each and then a tiny black ball of fondant. Then, use the veining tool to add two nostrils. Place the head on top of the body.
12. For the tail, mold the 1″ ball of pink fondant. One end should be flat (where it will attach to the body) and the rest should be a long tube that gets smaller until it ends in a point. Attach this to the body using edible glue or score it on using the veining tool.
13. Roll out the ball of red fondant and use the blade tool to carve seven triangle shapes. You might have to mold these a little with your fingers to look just right. Then using the glue or veining tool, attach these to the body. Start with one on the head in between the eyes and work your way down the body to the end of the tail.
14. Create a little heart and place it on top of the arms! Now he’s ready to go on top of a cupcake or cake or just be your little Valentine mascot!
Tag me in your Valentine Dragon creations with the hashtag #LetsEatCakeValentine! And if you have questions or tips or get stuck, leave me a comment. I’m excited to see your dragons! ????

My background is in publishing (I've worked at Parade, Men's Journal, Us Weekly, Stuff, Blender, Beachbody, and more), mostly with a focus in health, fitness, and entertainment. I've also run my own baking company and competed on Cupcake Wars, so hit me up with your baking questions!
For more details, check out my full bio or follow me on Instagram, Twitter, or LinkedIn.
- Is Starbucks Open On Thanksgiving? Here Are Their Hours for Turkey Day 2023 - November 9, 2023
- Dunkin’s Holiday Menu for 2023 Is Here and Includes Loaded Hash Browns and Cookie Butter Cold Brew - October 6, 2023
- If You Can’t Find the Starbucks Green Slime Tumbler, These Etsy Ones Are the Next Best Thing - September 12, 2023


Leave a Comment